What if you could satisfy your cheesecake craving in less time than it takes to brew a cup of coffee? This 90 second microwave cheesecake delivers rich, creamy indulgence without the hours of baking, cooling, and waiting that traditional cheesecakes demand. Perfect for those late-night dessert emergencies or when you need a single-serve treat that won’t tempt you with leftovers, this microwave cheesecake transforms just five simple ingredients into a velvety dessert that rivals its oven-baked counterpart. The magic happens in your microwave, where softened cream cheese, a fresh egg, and a touch of sweetener create a custard-like texture that’s surprisingly luxurious. No springform pan, no water bath, no complicated techniques—just mix, microwave, and enjoy. This revolutionary approach to cheesecake making proves that sometimes the quickest path leads to the most satisfying destination.
Ingredients
| Ingredient | Amount |
|---|---|
| Cream cheese, softened to room temperature | 2 oz |
| Large egg, room temperature | 1 |
| Powdered allulose (or powdered sweetener of choice) | 2 tablespoons |
| Pure vanilla extract | 1/4 teaspoon |
| Whipped cream for topping | As desired |
Timing
- Prep Time: 3 minutes
- Microwave Time: 90 seconds
- Cooling Time: 10 minutes
- Total Time: 13 minutes (faster than ordering dessert delivery and infinitely more satisfying)
This is one of the quickest desserts you can make from scratch, proving that homemade doesn’t have to mean time-consuming.
Step-by-Step Instructions
Step 1: Prepare Your Container and Ingredients
Select a microwave-safe ramekin or mug with at least 8-ounce capacity to prevent overflow during cooking. Ensure your cream cheese has been softened to room temperature—this is absolutely critical for achieving a smooth, lump-free texture. Leave it on the counter for 30-60 minutes before starting, or soften it in the microwave in 10-second intervals.
Tip: Test if cream cheese is properly softened by pressing it with your finger—it should indent easily without being melted or oily.
Step 2: Mix the Cheesecake Batter
Add the softened cream cheese to your ramekin or mug. Add the room temperature egg, powdered allulose, and vanilla extract directly on top. Using a fork or small whisk, mix vigorously until completely smooth and no cream cheese lumps remain. The mixture should be pale yellow, silky, and uniform in consistency. Scrape down the sides to ensure everything is incorporated.
Tip: Room temperature eggs blend more easily and create a smoother texture. If your egg is cold, place it in warm water for 5 minutes before cracking.
Step 3: Microwave to Perfection
Place your ramekin in the center of the microwave. Cook on full power for exactly 90 seconds. The cheesecake will puff up significantly during cooking—this is normal. Watch through the microwave window if possible to ensure it doesn’t overflow. The center should look just slightly jiggly when done, similar to a custard.
Tip: Microwave wattages vary. If using a 700-watt microwave, add 10-15 seconds. For 1200-watt models, start checking at 75 seconds to prevent overcooking.
Step 4: Cool and Set
Remove the ramekin carefully from the microwave using an oven mitt—it will be extremely hot. Let it cool at room temperature for 10 minutes. The cheesecake will deflate and set during this time, developing its characteristic dense, creamy texture. For a firmer, chilled cheesecake reminiscent of traditional versions, place it in the refrigerator for 30-60 minutes.
Tip: Resist the urge to eat it immediately. The cooling time allows the texture to transform from custard-like to proper cheesecake consistency.
Step 5: Top and Serve
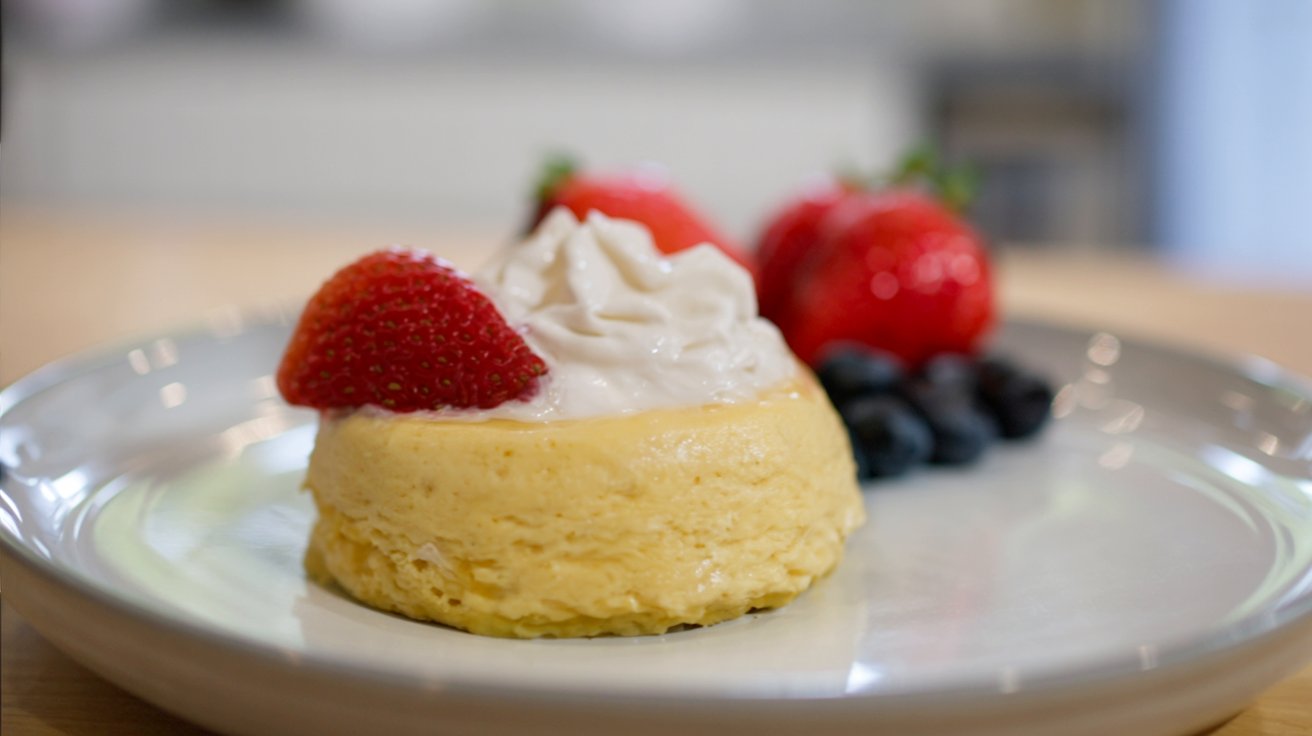
Once cooled to your preferred temperature, top with a generous dollop of whipped cream. Add fresh berries, a drizzle of sugar-free chocolate sauce, or a sprinkle of crushed graham crackers for extra flair. Enjoy directly from the ramekin with a spoon for the ultimate single-serve experience.
Tip: The whipped cream provides essential contrast to the dense, rich cheesecake base. Don’t skip it!
Nutritional Information
Per serving (1 cheesecake):
- Calories: 220 kcal
- Protein: 8 g
- Carbohydrates: 3 g
- Sugar: 2 g (from naturally occurring lactose)
- Net Carbs: 3 g
- Fat: 20 g
- Saturated Fat: 11 g
- Cholesterol: 230 mg
- Sodium: 180 mg
- Calcium: 8% of daily value
This microwave cheesecake is naturally low in carbohydrates and sugar, especially when using allulose as the sweetener. The protein content from both cream cheese and egg makes it surprisingly satiating for such a small dessert.
Healthier Alternatives
Dairy-Free Version: Substitute regular cream cheese with dairy-free cream cheese (such as Kite Hill or Miyoko’s) and use vegan whipped topping. The texture will be slightly different but still delicious.
Sugar Variations: Swap powdered allulose for powdered erythritol, monk fruit sweetener, or even regular powdered sugar if you’re not watching carbs. Each sweetener provides a slightly different sweetness level and aftertaste.
Protein Boost: Add 1 tablespoon of unflavored protein powder to increase the protein content to 18g per serving, making this an even more substantial treat.
Lower Fat Option: Use reduced-fat cream cheese (Neufchâtel) to cut calories by approximately 40 without dramatically affecting texture. Full-fat cream cheese does provide the richest result, however.
Flavor Variations: Mix in 1 tablespoon of unsweetened cocoa powder for chocolate cheesecake, or add lemon zest and 1/2 teaspoon lemon juice for a bright citrus version.
Serving Suggestions
This 90 second microwave cheesecake shines as a late-night indulgence when you need something sweet but don’t want to commit to a full dessert. Serve it in its ramekin for a rustic, casual presentation, or carefully invert it onto a small plate for a more elegant look. Top with fresh strawberries, blueberries, or raspberries for a classic cheesecake pairing that adds natural sweetness and visual appeal.
For special occasions, create a deconstructed cheesecake by crumbling graham crackers on the bottom before adding the batter, then topping with fruit compote. This single-serve dessert also works beautifully for intimate dinner parties where everyone wants their own personal cheesecake. Pair with hot coffee, espresso, or dessert wine for a sophisticated finish to any meal.
The beauty of this recipe is its versatility—eat it warm and gooey like a lava cake, or chilled for authentic cheesecake texture.
Common Mistakes to Avoid
- Using cold cream cheese: This is the number one mistake that leads to lumpy, uneven texture. Cold cream cheese won’t incorporate smoothly no matter how much you mix. Always bring it to room temperature first.
- Overcooking in the microwave: Every microwave has different wattage. Overcooking creates a rubbery, dry texture. Start with 90 seconds and adjust based on your microwave’s power. The center should still jiggle slightly when done.
- Using a container that’s too small: The cheesecake expands significantly during cooking. A container that’s too small will cause overflow and a messy microwave. Use at least an 8-ounce ramekin or mug.
- Eating it immediately after microwaving: The texture needs time to set and develop. Without cooling, it tastes more like scrambled eggs than cheesecake. Patience rewards you with proper texture.
- Forgetting to mix thoroughly: Cream cheese chunks won’t melt during the short cooking time. Mix until completely smooth for the best results.
Storing Tips
This microwave cheesecake is best enjoyed fresh but can be stored covered in the refrigerator for up to 2 days. Cover the ramekin tightly with plastic wrap or transfer to an airtight container to prevent it from absorbing refrigerator odors. The texture becomes firmer and more traditional cheesecake-like after refrigeration.
To reheat, microwave for 15-20 seconds to take the chill off, though many prefer it cold straight from the fridge. Unfortunately, this recipe doesn’t freeze well due to its custard-like consistency—frozen cheesecake becomes watery and grainy when thawed.
Make-Ahead Tip: You can prep the dry ingredients in advance, but since this recipe only takes 3 minutes to prepare, there’s little advantage to advance preparation. The entire process is designed for instant gratification.
Conclusion
This 90 second microwave cheesecake revolutionizes dessert making by delivering authentic cheesecake flavor and texture without the fuss, time, or temptation of a full-sized cake. Perfect for single servings, portion control, or satisfying spontaneous cravings, this quick dessert proves that homemade treats don’t require hours in the kitchen. The combination of just five simple ingredients transforms into something remarkably indulgent in less time than most desserts take to preheat the oven. Whether you’re following a low-carb lifestyle, need a quick weeknight dessert, or simply want personal-sized perfection, this microwave cheesecake delivers every time. We hope you enjoy making this lightning-fast treat as much as we do. Try it out and let us know in the comments how it turned out for you! Share your favorite topping combinations and creative variations. Don’t forget to rate this recipe and subscribe to our blog for more quick, delicious desserts delivered straight to your inbox.
FAQs
Q1. Can I use regular sugar instead of allulose?
Yes, you can substitute regular granulated sugar or powdered sugar for the allulose. Use the same amount (2 tablespoons). Regular sugar will add approximately 30 calories and 8g of carbs per serving. Powdered sugar incorporates more easily than granulated sugar in this no-bake application.
Q2. Why does my cheesecake have a rubbery texture?
Rubbery texture typically results from overcooking. Microwave wattages vary significantly, so 90 seconds might be too long for high-powered models. Reduce the cooking time by 10-15 seconds and check for doneness. The center should still jiggle slightly when you remove it—it will continue setting as it cools.
Q3. Can I double this recipe?
You can double the ingredients, but you’ll need to cook it in two separate ramekins rather than one large container. Doubling in a single container results in uneven cooking—the edges overcook while the center stays raw. Cook each ramekin separately for 90 seconds for consistent results.
Q4. What if I don’t have allulose?
Any powdered sweetener works in this recipe. Try erythritol, monk fruit blend, Swerve, or Stevia (though you’ll need less stevia as it’s more concentrated—start with 1 tablespoon). Each sweetener has a slightly different taste profile, so experiment to find your preference.
Q5. Can I make this without eggs?
Eggs provide structure and custard-like texture in this recipe, making them difficult to replace successfully. For an egg-free version, you could try 2 tablespoons of unsweetened applesauce, though the result will be less custardy and more pudding-like. The texture won’t be identical to traditional cheesecake.
90 Second Microwave Cheesecake: Quick Single-Serve Treat
Equipment
- Microwave
- 8-ounce microwave-safe ramekin or mug
- Fork or small whisk
- Oven mitt
Ingredients
Cheesecake Batter
- 2 oz cream cheese softened to room temperature
- 1 large egg room temperature
- 2 tbsp powdered allulose (or powdered sweetener of choice)
- 1/4 tsp pure vanilla extract
Topping
- whipped cream for topping, as desired
Instructions
- Prepare your container and ingredients: Use an 8-ounce microwave-safe ramekin or mug. Be sure the cream cheese is fully softened (indents easily when pressed). Soften on the counter 30–60 minutes or in the microwave in 10-second bursts.
- Mix the batter: Add softened cream cheese to the ramekin, then add the egg, powdered allulose, and vanilla. Mix vigorously with a fork or small whisk until perfectly smooth and lump-free; scrape the sides.
- Microwave to perfection: Cook on full power for about 90 seconds (it will puff). Center should be slightly jiggly like custard when done. Wattage tips: for 700W add 10–15 sec; for 1200W start checking at 75 sec.
- Cool and set: Carefully remove (it’s hot). Let cool 10 minutes to set. For a chilled, firmer texture, refrigerate 30–60 minutes.
- Top and serve: Finish with whipped cream. Optional: fresh berries, sugar-free chocolate drizzle, or crushed graham crackers. Enjoy straight from the ramekin.