Layered Ice Cream Cake – The No-Bake Dessert Everyone Will Love
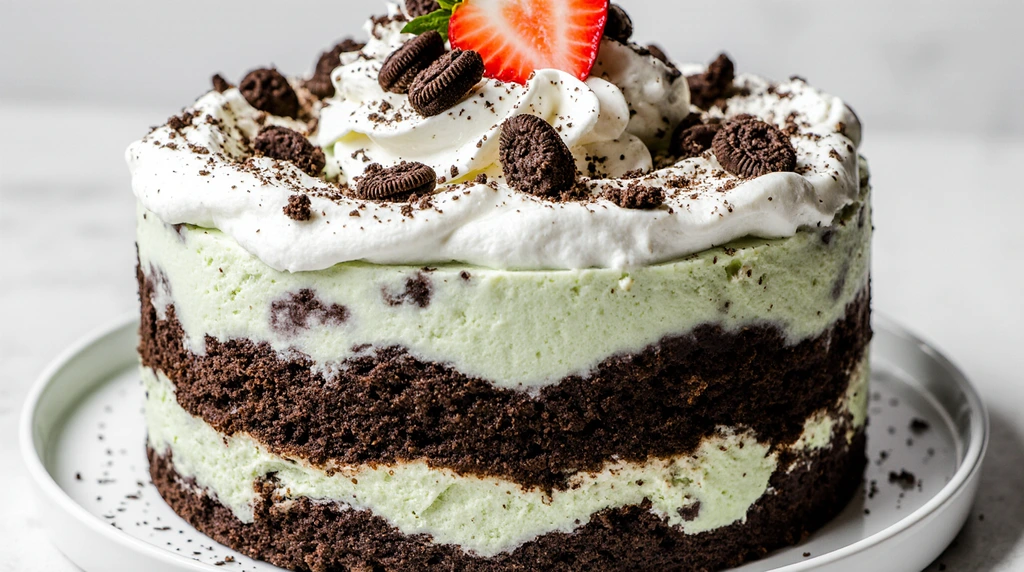
When the weather heats up and turning on the oven feels like a chore, this Layered Ice Cream Cake swoops in as the ultimate no-bake solution. It’s easy, impressive, and completely customizable. With a crunchy Oreo cookie crust, a playful outer shell made from ice cream sandwiches, and rich layers of mint chocolate chip, vanilla, and strawberry frozen treats, this cake is as stunning as it is delicious.
Perfect for birthdays, summer parties, or a last-minute treat, this frozen dessert is a dream come true for busy parents, party hosts, and ice cream lovers of all ages. It’s also an ideal make-ahead recipe, so you can prep it the day before and relax when the time to serve arrives.
Why You’ll Love This Layered Ice Cream Cake
-
No baking required – Just assemble and freeze.
-
Stunning presentation – Looks like a showstopper with minimal effort.
-
Family-friendly – Kids love it, and it’s endlessly customizable.
-
Budget-friendly – Uses simple, store-bought ingredients.
-
Make-ahead convenience – Prep it the night before for stress-free serving.
This recipe is especially great for beginner bakers or anyone hosting an event during warmer months. And because it’s so adaptable, you can personalize it to suit any flavor profile.
Ingredients You’ll Need
Here’s what goes into this chilled masterpiece:
-
15 Oreo cookies, divided
-
1 tablespoon milk
-
8–9 ice cream sandwiches, depending on size
-
1 pint mint chocolate chip ice cream
-
1 pint vanilla frozen yogurt
-
1 pint strawberry ice cream (or frozen yogurt)
-
1 (8-ounce) container frozen whipped topping, thawed
How to Make Layered Ice Cream Cake
Step 1: Prep Your Pan
Spray a 9-inch round springform pan with nonstick cooking spray. Line the side with waxed paper, using a little spray to help it stick. Trim the paper to match the height of the pan. This helps shape the cake and makes removing it easier later.
Step 2: Make the Cookie Crust
Crush 12 Oreo cookies in a food processor until fine. Add 1 tablespoon milk and pulse just until the mixture sticks together. Set aside.
Step 3: Form the Outer Wall with Ice Cream Sandwiches
Unwrap 4 ice cream sandwiches and cut each into quarters—once horizontally and once vertically. Stand the pieces on their ends, snugly side-by-side, around the edge of the prepared pan. Repeat with remaining sandwiches to create a complete wall. This is both decorative and functional.
Step 4: Add the Base
Spoon the crushed Oreo mixture into the center of the pan and press firmly to form an even base. Freeze the whole thing for at least 1 hour to set.
Step 5: Layer the Ice Cream
Let all three ice cream flavors soften at room temperature for about 15 minutes. Stir each one in a separate bowl until it’s smooth but still firm enough to spread.
Remove the cake from the freezer. Spread the mint chocolate chip ice cream on top of the cookie crust. Follow with a layer of vanilla frozen yogurt, then the strawberry. Use a spatula to even out each layer for a neat finish.
Step 6: Top It Off
Spread the thawed whipped topping over the top, swirling it for a decorative finish. Crush the remaining 3 Oreos and sprinkle over the top for crunch and visual flair.
Step 7: Freeze and Serve
Return the cake to the freezer and let it chill overnight. When ready to serve, remove the side of the pan and peel away the waxed paper. Slice into wedges with a sharp knife and enjoy!
Kitchen Equipment Needed
To make this dessert smooth and stress-free, gather these tools:
-
9-inch springform pan
-
Nonstick cooking spray
-
Waxed paper
-
Food processor or plastic bag + rolling pin (for crushing cookies)
-
Spatula
-
Sharp knife
-
Mixing bowls (for stirring ice cream)
-
Spoon (for pressing crust)
Tips for Success
✅ Work Quickly with Ice Cream
Keep your work surface cool and have everything prepped ahead of time. Ice cream melts fast, and speed helps preserve clean layers.
✅ Freeze Between Steps
Don’t rush. Freezing the base and the layers between steps ensures structure and keeps the cake from slumping.
✅ Use High-Quality Ice Cream
Choose premium ice cream or frozen yogurt for better flavor and texture. Avoid low-fat or overly icy varieties.
✅ Customize Freely
This cake is a blank canvas for your creativity. Switch out flavors, swap in different cookies, or try different toppings like chopped nuts, sprinkles, or chocolate chips.
Delicious Variations
🍫 Chocolate Overload
Use chocolate ice cream, cookies and cream frozen yogurt, and fudge ripple, then drizzle melted chocolate over the whipped topping.
🍓 Berry Delight
Try raspberry sorbet, vanilla frozen yogurt, and blueberry ice cream for a berry-packed version. Top with fresh berries.
☕ Mocha Dream
Layer coffee ice cream, chocolate frozen yogurt, and a touch of caramel sauce between layers for a coffeehouse-inspired treat.
🥜 Peanut Butter & Jelly
Use peanut butter ice cream, vanilla frozen yogurt, and strawberry sorbet. Crushed pretzels or chopped peanuts make a great topping.
Storage Tips
How to Store Leftovers
Wrap any leftover cake in plastic wrap or store in an airtight freezer-safe container. It will keep well in the freezer for up to 1 week, though it’s best enjoyed within the first 3–4 days for maximum texture.
Can I Make This Ahead?
Absolutely! This is the perfect make-ahead dessert. Make it up to 2 days in advance and keep it frozen until ready to serve.
Perfect Pairings
Serve this cake with:
-
A cup of hot espresso or cappuccino for contrast
-
A tall glass of cold milk
-
Sparkling lemonade for a refreshing citrus balance
-
A scoop of fruit sorbet alongside, for extra flair
Frequently Asked Questions (FAQ)
Can I use only one flavor of ice cream?
Yes! You can simplify the recipe with just one or two flavors. Just increase the quantity slightly to make up for missing layers.
What if I don’t have a springform pan?
You can use a deep cake pan lined with plastic wrap or parchment, though removal may be trickier. Be sure to freeze thoroughly.
Can I make this dairy-free?
Absolutely. Use non-dairy ice cream, whipped topping, and sandwich alternatives. There are many excellent vegan products available today.
Can I skip the ice cream sandwiches?
If you prefer, you can line the edges with ladyfingers or another soft cookie, or omit the outer edge altogether and go for a fully round cake.
Can kids help make this?
Yes! Kids love assembling the layers and crushing the cookies. Just make sure an adult handles the sharp tools and final serving.
Final Thoughts
This Layered Ice Cream Cake is the kind of dessert that delivers big impact with minimal effort. It’s fun to make, beautiful to serve, and guaranteed to impress your guests—whether it’s a backyard barbecue, birthday party, or weekend treat. The combo of crunchy cookies, creamy layers, and nostalgic ice cream sandwiches makes every bite a delicious throwback.