Red Velvet Cheesecake Cake: A Stunning Dessert Mashup You’ll Love
If you’re looking for a dessert that’s as visually stunning as it is delicious, this Red Velvet Cheesecake Cake is your answer. It’s the perfect combination of two iconic desserts—red velvet cake and classic vanilla cheesecake—all crowned with a fluffy homemade whipped topping. Whether you’re celebrating a birthday, hosting a holiday gathering, or simply treating yourself to something indulgent, this layered cake is sure to impress every guest at the table.
This recipe is ideal for home bakers of all skill levels who want to create something that looks bakery-worthy without the need for complicated techniques. Using a boxed cake mix as a base means less time measuring and more time enjoying the magic of flavor and texture that happens when a rich cheesecake meets the airy elegance of whipped cream.
Why You’ll Love This Red Velvet Cheesecake Cake
This cake is a triple threat:
-
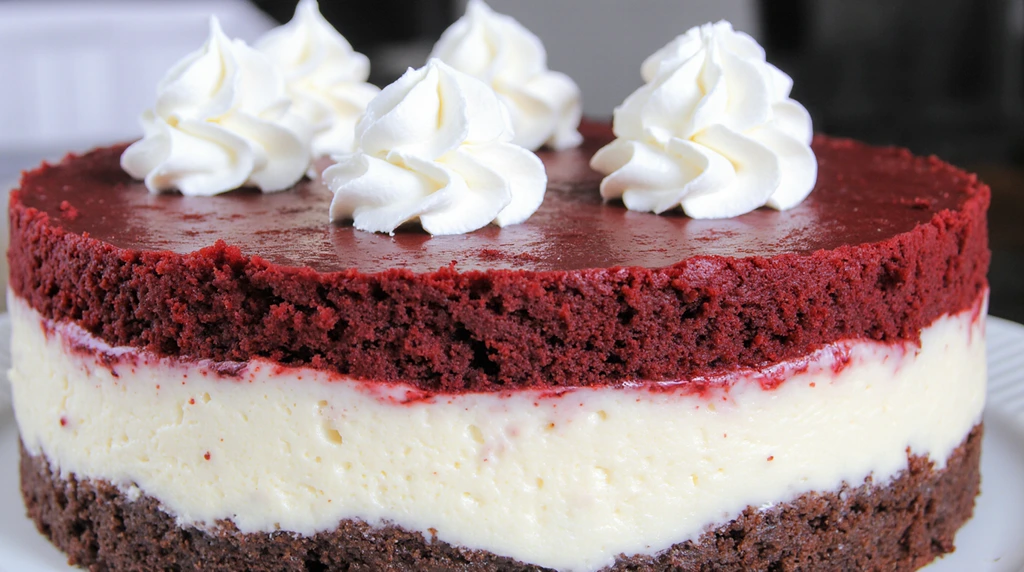
Moist and Fluffy Red Velvet Cake Base
Using a box mix keeps things simple while still delivering a flavorful, velvety base with that signature cocoa-tinted red hue. -
Creamy Cheesecake Center
The homemade cheesecake layer is luscious and smooth, baked to perfection with a hint of vanilla and tangy sour cream. -
Light Whipped Topping
Instead of a heavy buttercream, we finish this cake with a cloud of sweetened whipped cream, which adds a delightful contrast in texture and makes every bite feel light and luxurious.
Ingredients Breakdown
Red Velvet Cake Layer:
-
1 box Red Velvet Cake Mix (plus ingredients listed on the box)
Cheesecake Layer:
-
16 oz Cream Cheese, softened
-
1 1/3 cup Sugar
-
4 large Eggs
-
2/3 cup Sour Cream
-
2 tbsp All-Purpose Flour
-
2 tsp Vanilla Extract
-
1/2 tsp Salt
Whipped Cream Layer:
-
2 cups Heavy Cream
-
4 tbsp Powdered Sugar
-
2 tsp Vanilla Extract
Step-by-Step Instructions
1. Bake the Red Velvet Cake Layer
-
Preheat your oven to 350°F (177°C).
-
Prepare a 9-inch springform cake pan by greasing and flouring it thoroughly.
-
Mix and bake the red velvet cake according to box instructions.
-
Bake for 30–32 minutes or until a toothpick inserted comes out clean.
-
Cool in the pan for 10–15 minutes, then transfer to a wire rack.
-
Once cooled, level the top with a cake leveler or serrated knife.
2. Make the Cheesecake Layer
-
Reduce oven temperature to 325°F if needed.
-
In a large bowl, beat cream cheese and sugar until light and fluffy (about 3 minutes).
-
Add eggs one at a time, beating well after each addition.
-
Mix in sour cream, flour, vanilla extract, and salt until fully incorporated.
-
Pour mixture into a greased 9-inch springform pan and bake for 55–65 minutes, or until the center is just slightly jiggly.
-
Let cool at room temperature for 30 minutes, then freeze for one hour to firm up.
-
Once chilled, level the cheesecake layer as needed.
3. Whip the Cream Topping
-
In a chilled bowl, add heavy cream, powdered sugar, and vanilla extract.
-
Whisk by hand with a balloon whisk for 5–6 minutes until soft peaks form (you can also use a hand mixer).
-
Be careful not to overwhip—it should be pillowy and soft.
4. Assemble the Cake
-
Place the red velvet layer on a cake stand or plate.
-
Carefully position the cheesecake layer on top.
-
Spread the whipped topping over the cheesecake and use a piping bag for decorative dollops.
-
Sprinkle reserved red velvet cake crumbs around the edges for a bakery-worthy finish.
Kitchen Equipment You’ll Need
-
2x 9-inch Springform Cake Pans
-
Stand Mixer or Hand Mixer
-
Balloon Whisk or Electric Whisk
-
Mixing Bowls (at least 3)
-
Rubber Spatula
-
Cake Leveler or Serrated Knife
-
Wire Cooling Rack
-
Offset Spatula (for spreading whipped cream)
-
Piping Bag + Decorative Tip (optional)
-
Cake Stand or Serving Platter
Tips, Tricks, and Variations
-
Short on Time? You can make the red velvet layer and cheesecake up to 2 days in advance. Just wrap them well and refrigerate.
-
Want Extra Chocolate? Add a layer of chocolate ganache between the cheesecake and cake.
-
Swap the Cake Mix: Not a fan of red velvet? Use chocolate, vanilla, or even strawberry cake mix.
-
Add Texture: Crushed pecans or walnuts between the layers give a delightful crunch.
-
Go Fruity: Drizzle raspberry or cherry sauce over each slice before serving for a tangy contrast.
How to Store Leftovers
This cake stores beautifully!
-
Refrigerator: Keep any leftovers covered in the fridge for up to 5 days. Make sure it’s tightly wrapped to prevent the whipped cream from absorbing fridge odors.
-
Freezer: You can freeze individual slices (without the whipped topping) for up to 2 months. Wrap tightly in plastic wrap and then in foil.
Before serving frozen slices, thaw them overnight in the fridge and top with fresh whipped cream if desired.
Food & Drink Pairings
-
Coffee: A dark roast espresso or mocha latte pairs perfectly with the richness of this cake.
-
Dessert Wine: Try a chilled glass of ruby port or a sweet Riesling.
-
Fruit Compote: A spoonful of berry compote adds an acidic edge that balances the sweetness.
FAQs
Q: Can I make this cake ahead of time?
A: Absolutely! You can bake and store the red velvet and cheesecake layers separately for up to 2 days in advance. Assemble and frost the day of serving for best results.
Q: Can I use whipped topping (like Cool Whip) instead of homemade whipped cream?
A: Yes, for convenience, you can use store-bought whipped topping. However, homemade whipped cream has a fresher flavor and a lighter texture.
Q: What if I don’t have a springform pan?
A: You can use regular round cake pans, but lining them with parchment paper will make removing the cheesecake much easier.
Q: How do I keep my cheesecake from cracking?
A: Avoid overmixing the batter and do not open the oven door during baking. Letting it cool gradually also helps prevent cracking.
Q: Can I make it gluten-free?
A: Yes! Use a gluten-free red velvet cake mix and swap the flour in the cheesecake for a gluten-free all-purpose blend.
Final Thoughts
The Red Velvet Cheesecake Cake is more than just a dessert—it’s an experience. It’s luxurious, festive, and layered with love. Whether you’re an avid baker or someone who enjoys the occasional weekend treat, this cake will win hearts and palates alike.
Did you make this recipe? We’d love to see your creations! Share your photos on social media and tag us. And don’t forget to subscribe to the blog for more gourmet-style recipes made simple. Sharing is caring—pass this recipe along to your favorite dessert lover and spread the sweet joy!