Strawberry Crunch Cheesecake Cones: The Perfect No-Bake Party Treat
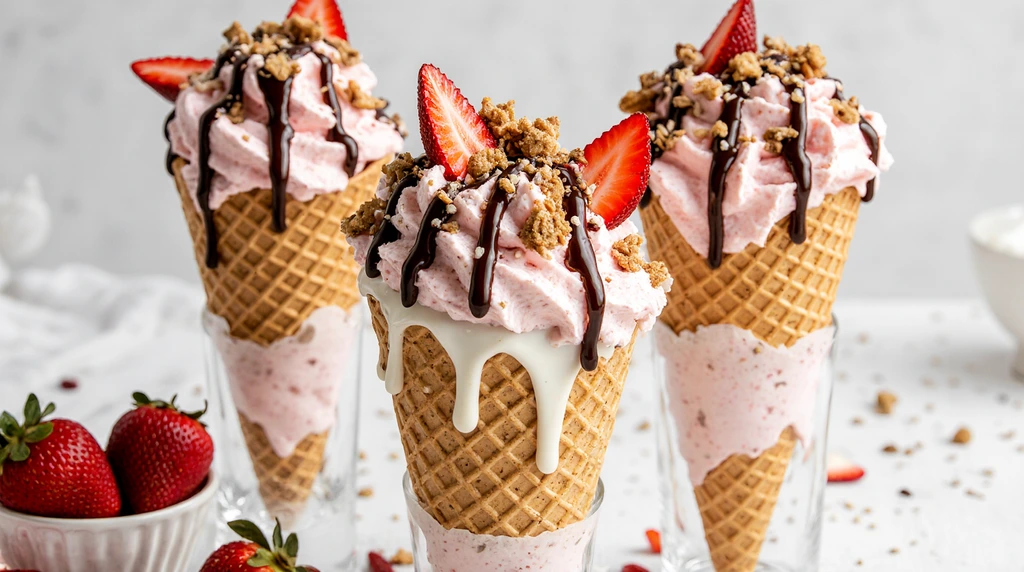
Imagine the classic flavors of strawberry cheesecake transformed into a playful, handheld dessert: crisp waffle cone shells coated in strawberry-Oreo crumble, then piped full of cloud‑light cheesecake filling and crowned with juicy strawberry bites. Strawberry Crunch Cheesecake Cones are a show‑stopping, no‑bake delight that will elevate any celebration—yet they’re simple enough for home bakers of all levels. Whether you’re hosting a summer BBQ, a kid’s birthday party, or looking for an Instagram‑worthy dessert finale, these cones are guaranteed to impress.
Why You’ll Love These Cones
-
No baking required: Skip the oven—just assemble and chill.
-
Textural contrast: Crunchy cones, creamy filling, fresh fruit.
-
Customizable: Swap flavors, toppings, or coatings to suit any occasion.
-
Make‑ahead friendly: Prep components in advance and assemble on party day.
-
Visually stunning: Perfect for dessert tables, picnic spreads, or ice‑cream socials.
Who This Recipe Is For
-
Busy hosts who need a fuss‑free yet elegant dessert.
-
Families seeking a fun activity to make with kids.
-
Food influencers hunting a photogenic recipe.
-
Anyone craving cheesecake, but dreading baking.
Ingredients
Crumble for Cones
-
1 package strawberry wafer cookies
-
18–20 golden Oreo cookies
-
Ice cream waffle cones
-
12 oz white chocolate chips, melted
-
Freeze‑dried strawberries, crushed (optional, for extra pink hue)
Strawberry Cheesecake Filling
-
10 tbsp cold heavy whipping cream
-
12 oz full‑fat cream cheese, softened
-
¼ cup granulated sugar
-
1 tbsp confectioners’ sugar
-
2 tbsp sour cream, at room temperature
-
1 tsp lemon juice
-
1 tsp vanilla extract
-
Fresh strawberries, finely diced (optional)
-
Melted chocolate (optional drizzle)
Kitchen Equipment Needed
-
Food processor or blender (for crumble)
-
Microwave or double boiler (to melt white chocolate)
-
Mixing bowls (medium and large)
-
Electric hand mixer or stand mixer
-
Rubber spatula
-
Piping bag with large round or star tip
-
Baking sheet or tray
-
Parchment paper
-
Glass or tall cup (to hold cones upright)
Step‑By‑Step Instructions
1. Prepare the Crumble Coating
-
Break strawberry wafer cookies and golden Oreos into chunks.
-
Pulse in the food processor until fine crumbs form.
-
Stir in crushed freeze‑dried strawberries if desired for extra color.
-
Transfer crumbs to a shallow plate or bowl.
2. Coat the Cones
-
Melt white chocolate chips in the microwave (30‑second intervals, stirring between).
-
Dip each cone’s rim and upper exterior into the melted chocolate.
-
Immediately roll the chocolate‑coated area into the crumble mixture, pressing gently.
-
Stand the cones upright on a parchment‑lined tray. Chill until set, about 10 minutes.
3. Make the Cheesecake Filling
-
In a large bowl, whip heavy cream on medium‑high until stiff peaks form; set aside.
-
In another bowl, beat cream cheese and granulated sugar until smooth and creamy.
-
Add confectioners’ sugar, sour cream, lemon juice, and vanilla extract; beat for 2–3 minutes until fluffy.
-
Gently fold whipped cream into the cream cheese mixture until fully incorporated.
-
Stir in diced fresh strawberries if using.
4. Assemble the Cones
-
Fit a piping bag with a large star or round tip and fill with cheesecake filling.
-
Spoon a small amount of crumble into each cone base to anchor the filling.
-
Pipe the filling into each cone, swirling to create an elegant peak.
-
Sprinkle extra crumble on top and drizzle melted chocolate if desired.
-
Chill cones for at least 30 minutes before serving.
Tips, Shortcuts & Variations
-
Flavor Swaps: Use chocolate wafers and mint Oreos with mint cheesecake filling for a “grasshopper” twist.
-
Nutty Crunch: Mix in finely chopped nuts (almonds or pistachios) with the crumble.
-
Mini Cones: Perfect for bite‑sized party favors—just halve ingredients.
-
Dietary Adjustments:
-
Gluten‑free: Use gluten‑free wafers, cookies, and cones.
-
Lower sugar: Substitute sugar with monkfruit or erythritol blends.
-
Make‑Ahead & Storage
-
Crumble & filling: Prepare up to 2 days ahead; keep chilled separately.
-
Assembled cones: Best served within 6 hours—overnight can cause cones to soften.
-
Leftovers: Store upright in an airtight container in the fridge for up to 24 hours.
Serving Suggestions & Pairings
-
Beverages: Sparkling rosé, iced green tea, or a fruity spritzer complement the taste.
-
Sides: Fresh fruit platters, mini tartlets, or sorbet scoops round out a dessert spread.
Frequently Asked Questions (FAQ)
Q: Can I bake the cones for extra crispiness?
A: Standard ice‑cream cones need no baking; chilling is sufficient. Avoid heat to preserve the crunch.
Q: How do I prevent filling from oozing?
A: Ensure your cream cheese and whipped cream are well‑chilled. Filling holds shape best when very cold.
Q: Can I use store‑bought cheesecake filling?
A: For the freshest flavor and texture, homemade is recommended. But high‑quality store mixes can work in a pinch.
Q: What’s the best way to keep cones upright?
A: Use an empty glass or a cone stand. You can also insert cones into floral foam hidden under parchment.
Final Thoughts
These Strawberry Crunch Cheesecake Cones transform familiar cheesecake flavors into a playful, no‑bake delight that’s as gorgeous as it is delicious. Perfect for parties, picnics, or simply treating yourself to a unique dessert, they’re sure to become a new favorite.
If you enjoyed this recipe, please share it on your social channels and subscribe to the blog for more creative, crowd‑pleasing recipes delivered straight to your inbox. Happy “baking” (and piping)!






















Leave a Reply