Introduction
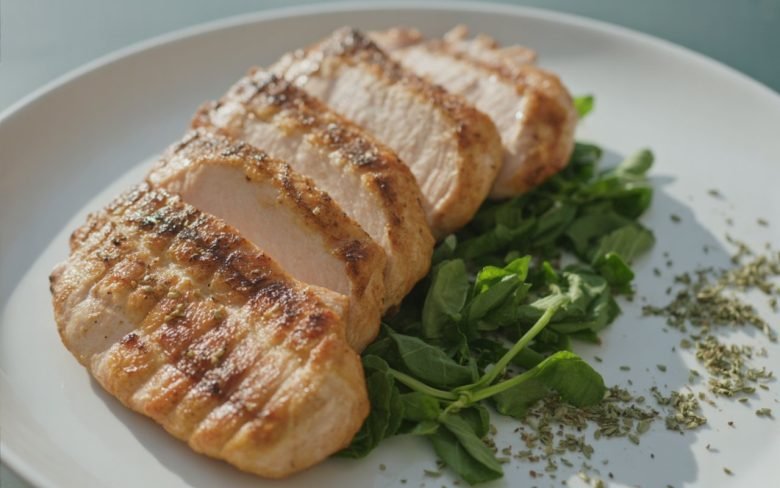
Have you ever struggled to keep chicken breasts moist when cooking on the stovetop, only to end up with dry, bland meat? That’s exactly what inspired me to perfect this juicy stove top chicken breasts recipe — a method that delivers tenderness and flavor every time. This recipe shows that stovetop chicken doesn’t have to be dry or dull; with a few technique tweaks, you can turn plain breasts into succulent, restaurant-quality mains right at home.
In this post, I’ll guide you through ingredients, timing, step-by-step instructions, nutrition insights, smart substitutes, plating ideas, and troubleshooting tips — everything you need to master juicy stovetop chicken.
Ingredients List
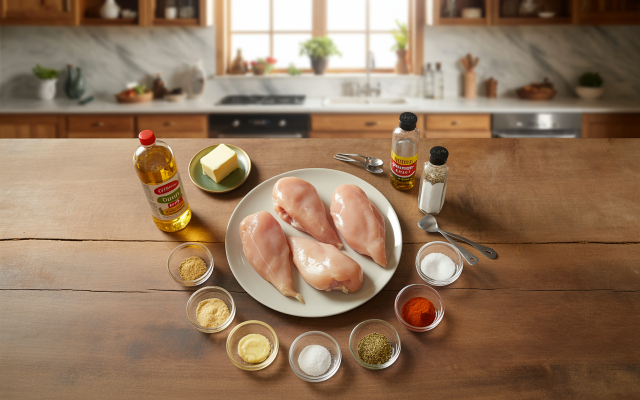
Here’s a clear ingredient breakdown, complete with substitution options and sensory cues to help you choose the best variations:
| Ingredient | Quantity | Notes & Substitutions |
|---|---|---|
| Vegetable oil or canola oil (divided) | 3 Tbsp | Choose neutral oils with high smoke point |
| Boneless, skinless chicken breasts | 4 pieces (about 1 lb total) | Use thin-cut or butterfly thicker breasts for faster cooking |
| Cooking spray | — | Helps prevent sticking in pan |
| Salt & fresh ground pepper | To taste | Adjust later after cooking |
| Garlic powder | ½ tsp | Adds savory depth |
| Onion powder | ½ tsp | Sub with shallot powder if preferred |
| Dried basil | ½ tsp | Add dried thyme or oregano instead |
| Paprika (smoked or sweet) | ½ tsp | Smoked adds smoky nuance |
| Unsalted butter (divided) | 2 Tbsp | Offers richness; can reduce or omit if desired |
As oil heats, it tingles in the pan. When chicken hits the surface, you’ll hear a satisfying sizzle. The seasoning melds to form a golden crust that seals juices inside.
Timing
-
Preparation Time: 5 minutes (seasoning and preheating)
-
Cooking Time: 12–15 minutes
-
Total Time: ~17–20 minutes
That’s significantly faster than baking or slow-cooking methods. You get tender chicken in under 20 minutes — ideal for busy weeknights or quick dinners without sacrificing flavor or juiciness.
Step-by-Step Instructions
Step 1: Prepare & Season
Pat the chicken breasts dry with paper towels. Lightly spray or rub with oil to help seasoning adhere. Season both sides with salt, pepper, garlic powder, onion powder, dried basil, and paprika.
Step 2: Preheat the Pan
Use a heavy skillet (cast iron or stainless steel), and heat 1½ Tbsp of oil over medium-high heat until shimmering but not smoking. A drop of water should dance and evaporate quickly.
Step 3: Sear One Side
Place the chicken in the pan (do not overcrowd). Sear without moving for 4–5 minutes until the edges are golden. Resist the temptation to flip early — a crust must form.
Step 4: Flip & Add Butter
Flip the breasts and immediately add the remaining 1½ Tbsp oil plus 1 Tbsp butter. Tilt the pan slightly and spoon melted butter over the chicken repeatedly to baste.
Step 5: Lower Heat & Finish Cooking
Reduce heat to medium and continue cooking 4–6 minutes, occasionally basting, until internal temperature reaches about 160 °F (71 °C). Be careful not to overcook — chicken will continue to cook slightly while resting.
Step 6: Rest Before Serving
Remove chicken from heat, tent loosely with foil, and rest for 5 minutes. This lets juices redistribute and finish cooking. Slice and serve immediately.
Always rest poultry — skipping this step often leads to juice loss and dryness.
Nutritional Information
Approximate per breast (serves 4):
-
Calories: ~220 kcal
-
Protein: ~32 g
-
Fat: ~8 g
-
Saturated fat: ~3 g
-
Carbohydrates: ~0.5 g
-
Sodium: variable (depending on added salt)
-
Iron & B vitamins from chicken
This recipe provides a protein-dense, low-carb main — perfect for balanced meals.
Healthier Alternatives for the Recipe
-
Use olive oil spray or reduce total oil to 2 Tbsp to cut fat.
-
Swap unsalted butter for a light butter or omit entirely, using just oil and fresh herbs.
-
Season with fresh herbs or citrus zest instead of dried powders.
-
For leaner protein, use thin-cut chicken breast cutlets; they cook faster and stay moist if watched carefully.
-
Serve alongside large portions of vegetables or salad to shift the plate balance toward more fiber and micronutrients.
Serving Suggestions
-
Slice chicken and serve over mixed greens with vinaigrette for a quick protein salad.
-
Accompany with mashed potatoes, rice pilaf, or roasted root vegetables to soak up juices.
-
Serve with a simple sauce — lemon butter, mushroom gravy, or tomato salsa — for extra flavor variation.
-
Use leftover chicken in sandwiches, wraps, quesadillas, or chop into pasta.
Common Mistakes to Avoid
-
Skipping pat-drying: Moisture prevents good sear — always blot dry first.
-
Flipping too early: Wait for full crust — flipping prematurely causes sticking and tearing.
-
Overcrowding pan: Leads to steaming instead of searing. Work in batches if needed.
-
Cooking on too high heat throughout: Searing is high heat; finish on medium to prevent burning exterior while undercooking inside.
-
Not resting: Serving immediately yields torn fibers and lost juice — always rest.
Storing Tips for the Recipe
-
Refrigerate: Cool completely and store in airtight container up to 3 days.
-
Reheat: Gently reheat in skillet over low heat with a splash of stock or water to prevent drying.
-
Make-ahead: You can pre-season and refrigerate chicken for a few hours; bring to room temp before cooking for even heat.
-
Freezing: Cooked chicken can be frozen (sealed) for up to 2 months. Thaw before reheating gently.
Conclusion
This juicy stove top chicken breasts recipe proves you don’t need an oven or hours — just the right technique, heat control, and simple seasonings. In fewer than 20 minutes, you’ll have tender, flavorful chicken that elevates any meal. Try this this week, leave your results or spice tweaks in the comments, and subscribe for more quick, delicious, and health-focused recipes delivered straight to your inbox.
FAQs
Q1: My chicken turned rubbery — what happened?
Likely overcooked. Use a meat thermometer and remove at ~160 °F, then rest for residual heat to finish cooking.
Q2: Can I use bone-in chicken?
Yes — but increase cooking time and reduce initial searing heat to ensure doneness without burning.
Q3: My pan stuck — why?
Insufficient preheating or flipping too soon. Be sure the pan is hot and dry before adding chicken.
Q4: How do I add flavor without extra salt?
Use citrus juice, herbs (thyme, rosemary), garlic, and smoky paprika to boost depth without sodium.
Q5: Can I double this recipe?
Yes — use a larger skillet or cook in two batches to avoid crowding and maintain heat control.
Juicy Stove Top Chicken Breasts Recipe
Equipment
- Heavy skillet (cast iron or stainless steel)
- Tongs
- Instant-read thermometer
- Foil for resting
Ingredients
Main Ingredients
- 3 Tbsp Vegetable oil or canola oil (divided) Use neutral oils with high smoke point
- 4 pieces Boneless, skinless chicken breasts About 1 lb total; use thin-cut or butterfly thick pieces
- Cooking spray Helps prevent sticking
- Salt & fresh ground pepper To taste; adjust after cooking
- 0.5 tsp Garlic powder Adds savory depth
- 0.5 tsp Onion powder Substitute shallot powder if preferred
- 0.5 tsp Dried basil Use dried thyme or oregano as alternatives
- 0.5 tsp Paprika (smoked or sweet) Smoked paprika adds depth
- 2 Tbsp Unsalted butter (divided) Adds richness; can reduce or omit for lighter version
Instructions
- Step 1: Prepare & Season
Pat the chicken breasts dry with paper towels. Lightly spray or rub with oil. Season both sides with salt, pepper, garlic powder, onion powder, dried basil, and paprika. - Step 2: Preheat the Pan
Heat 1½ Tbsp oil in a heavy skillet over medium-high heat until shimmering. A drop of water should sizzle and evaporate immediately. - Step 3: Sear One Side
Place chicken in the pan without overcrowding. Sear for 4–5 minutes without moving until golden. Don’t flip early — let the crust form. - Step 4: Flip & Add Butter
Flip chicken and add remaining 1½ Tbsp oil plus 1 Tbsp butter. Tilt the pan and spoon melted butter over chicken to baste repeatedly. - Step 5: Lower Heat & Finish Cooking
Reduce heat to medium and cook another 4–6 minutes, basting occasionally, until internal temperature reaches 160°F (71°C). - Step 6: Rest Before Serving
Remove from heat, tent with foil, and rest for 5 minutes to lock in juices. Slice and serve immediately.
Notes
– Always rest chicken before slicing — it keeps juices intact.
– Use an instant-read thermometer for best accuracy.
– Add lemon juice or pan sauce for a bright finish.
– Slice against the grain for maximum tenderness.
– Serve with mashed potatoes, roasted veggies, or salad.