Have you ever walked past a bakery and wondered how they create those perfectly crusty artisan breads with minimal effort? This crusty cranberry nut no-knead bread proves that bakery-quality results don’t require fancy equipment or years of experience. With just a wooden spoon and some patience, you’ll create a stunning loaf that rivals any professional baker’s creation. The secret lies in the long fermentation process that develops complex flavors and that coveted crusty exterior while keeping the interior tender and studded with sweet cranberries and crunchy nuts.
What makes this recipe revolutionary is its simplicity – no kneading, no special techniques, just mix, wait, and bake. The combination of tart cranberries and earthy walnuts creates a perfect balance that transforms ordinary bread into something extraordinary. Whether you’re a complete beginner or an experienced baker looking for a hassle-free artisan bread, this recipe delivers impressive results every single time.
Ingredients
| Ingredient | Amount | Notes |
|---|---|---|
| Bread flour or all-purpose flour | 3 cups + 2 Tbsp (390g) | Spooned & leveled, plus more for dusting |
| Coarse sea salt | 2 teaspoons | Essential for flavor depth |
| Instant yeast | 1/2 teaspoon | Platinum Yeast from Red Star recommended |
| Chopped walnuts or pecans | 3/4 cup (95g) | Fresh, roughly chopped |
| Dried cranberries | 3/4 cup (105g) | Plump and sweet-tart |
| Honey | 1 Tablespoon (21g) | Adds subtle sweetness |
| Warm water | 1 1/2 cups (360ml) | About 95°F (35°C) |
Timing
- Prep Time: 10 minutes active time
- Rising Time: 12-18 hours first rise + 30 minutes second rise
- Baking Time: 35 minutes
- Total Time: 13-19 hours (mostly hands-off waiting)
This extended timing might seem daunting, but remember – you’re only actively working for about 15 minutes total. The rest is the magic of fermentation doing the hard work for you.
Step-by-Step Instructions
Step 1: Mix the Dough
In a large bowl, combine the flour, coarse sea salt, instant yeast, chopped walnuts, and dried cranberries using a silicone spatula. Mix the honey with the warm water until dissolved, then pour this mixture over the dry ingredients. Stir everything together until you have a shaggy, sticky dough – resist the urge to add more flour. Tip: The dough should look almost too wet; this moisture creates steam during baking, resulting in that perfect crusty exterior and soft interior.
Step 2: First Rise
Gently shape the sticky dough into a rough ball using the spatula – perfection isn’t necessary here. Cover the bowl tightly with plastic wrap or a damp kitchen towel. Let it rest on your counter at room temperature for 12-18 hours. Tip: Start this in the evening for fresh bread the next morning, or morning for dinner rolls. The dough will double in size, develop air bubbles on the surface, and stick to the sides of the bowl.
Step 3: Shape the Dough
Turn the risen dough onto a lightly floured surface. With floured hands, gently shape it into a ball – again, don’t worry about perfection. Transfer the dough ball onto a large piece of parchment paper (ensure it’s high-heat safe). Using a sharp knife, kitchen shears, or bread lame, score an X on top about 1/4 inch deep. Tip: Place the parchment and dough inside a bowl to prevent spreading during the final rise.
Step 4: Second Rise and Preheat
Cover the shaped dough lightly with plastic wrap or a clean towel and let it rest for 30 minutes. Meanwhile, place your Dutch oven with its lid inside your oven and preheat to 475°F (246°C). Tip: This crucial step ensures your pot is scorching hot, creating an instant burst of steam when the dough hits it – essential for that crusty exterior.
Step 5: Bake Covered
After 30 minutes, carefully remove the hot Dutch oven using oven mitts. Lift the dough using the parchment paper edges and lower it into the pot, paper and all. Cover with the lid immediately. Bake for 25 minutes. Tip: The covered environment traps steam from the dough, helping develop that golden, crackling crust.
Step 6: Finish Uncovered
Remove the lid carefully (steam will escape) and continue baking for 8-10 more minutes until the bread turns deep golden brown. To test doneness, tap the bottom – it should sound hollow. For precision, use an instant-read thermometer; the center should reach 195°F (90°C). Tip: Those extra uncovered minutes create the perfect color and ensure the crust stays crispy.
Step 7: Cool Properly
Remove the pot from the oven and carefully transfer the bread to a wire rack. Let it cool for at least 20 minutes before slicing – this patience allows the interior to finish setting. Tip: Cutting too soon releases steam and can make the crumb gummy. The crackling sounds you hear while cooling are signs of a perfectly crusty loaf.

Nutritional Information
Per serving (based on 12 slices):
- Calories: 180 kcal
- Protein: 5g
- Carbohydrates: 32g
- Dietary Fiber: 2g
- Sugars: 6g
- Fat: 4g (primarily from nuts)
- Sodium: 390mg
- Iron: 10% DV
This bread provides sustained energy from complex carbohydrates while the nuts add healthy fats and protein. The cranberries contribute antioxidants and vitamin C, making this more nutritious than standard white bread.
Healthier Alternatives
Transform this already wholesome bread with these smart swaps. Replace half the bread flour with whole wheat flour for added fiber and nutrients – expect a slightly denser texture but richer flavor. Swap honey for maple syrup or agave nectar if preferred, maintaining that subtle sweetness.
For lower sugar content, reduce cranberries to 1/2 cup and add 1/4 cup unsweetened coconut flakes. Vegan option: The recipe is already vegan-friendly if using agave instead of honey. Gluten-free variation: While challenging for no-knead bread, try a 1:1 gluten-free flour blend designed for bread, though results will differ in texture.
Consider adding 2 tablespoons of ground flaxseed or chia seeds to boost omega-3 fatty acids. Replace walnuts with almonds or pumpkin seeds for different nutritional profiles while maintaining that satisfying crunch.
Serving Suggestions
This versatile bread shines in countless ways. Serve warm slices with cultured butter and a drizzle of honey for an indulgent breakfast. Toast thick slices and top with cream cheese and orange marmalade for a delightful afternoon treat. The sweet-savory balance makes it perfect alongside sharp cheeses and fig jam on a holiday cheese board.
For dinner, pair with hearty soups and stews – the cranberries complement butternut squash soup beautifully. Create memorable sandwiches with turkey, brie, and arugula. During holidays, cube day-old bread for exceptional stuffing with sage and celery. The festive cranberries and nuts make this ideal for Thanksgiving tables or Christmas morning, wrapped in a kitchen towel as a thoughtful homemade gift.
Common Mistakes to Avoid
- Adding extra flour: The dough should be sticky and shaggy. Adding flour creates dense, heavy bread. Solution: Trust the process – wet dough equals airy crumb.
- Rushing the first rise: Cutting fermentation short reduces flavor development. Solution: Plan ahead and give it the full 12-18 hours for complex, tangy notes.
- Using regular table salt: Fine salt can make the bread taste flat or overly salty. Solution: Stick with coarse sea salt for better flavor distribution and texture.
- Skipping the pot preheating: A cold Dutch oven won’t create necessary steam. Solution: Always preheat for the full 30 minutes at 475°F.
- Disturbing the dough too much: Overhandling deflates air bubbles. Solution: Use gentle movements when shaping; imperfect rounds bake beautifully.
Storing Tips
Store completely cooled bread in an airtight container or wrapped in a clean kitchen towel at room temperature for up to one week. The crust softens slightly after day one but remains delicious. Revival trick: Refresh day-old slices by toasting or warming in a 350°F oven for 5 minutes to restore crustiness.
For longer storage, slice the cooled loaf and freeze in a freezer bag for up to 3 months. Toast frozen slices directly without thawing for instant artisan bread. Make-ahead tip: Mix the dough in the morning, let it rise all day while at work, then bake in the evening for next-day enjoyment. The dough can also cold-ferment in the refrigerator for up to 3 days for even more complex flavors.
Conclusion
This crusty cranberry nut no-knead bread transforms simple ingredients into bakery-worthy artisan loaves with minimal effort. The long fermentation develops incredible flavors while creating that perfect contrast between the crackling crust and tender, fruit-studded interior. What makes this recipe truly special is its forgiving nature – no special skills, no kneading, just patience rewarded with exceptional homemade bread.
We hope this becomes your go-to recipe for impressive homemade bread that requires almost no hands-on time. Try this recipe today and share your results in the comments below! We’d love to see your beautiful loaves and hear about any creative variations you discover. Don’t forget to rate this recipe and subscribe to our blog for more foolproof artisan baking delivered straight to your inbox.
FAQs
Q1. Can I use active dry yeast instead of instant yeast?
Yes, you can substitute active dry yeast, but you’ll need to activate it first. Dissolve 1/2 teaspoon active dry yeast in the warm water with honey and let it foam for 5-10 minutes before adding to the dry ingredients. The rise times remain the same, though active dry yeast might work slightly slower.
Q2. What if I don’t have a Dutch oven?
Any heavy, oven-safe pot with a tight-fitting lid works well – cast iron, enamel-coated cast iron, or even a heavy stainless steel pot. You can also use a regular baking sheet with an inverted metal bowl or roasting pan as a lid. The key is trapping steam during the first part of baking.
Q3. Can I add different mix-ins or omit the cranberries and nuts?
Absolutely! This base recipe is endlessly adaptable. Try dried apricots with pistachios, raisins with sunflower seeds, or chocolate chips with hazelnuts. For plain bread, simply omit the add-ins. Keep total mix-ins around 1.5 cups to maintain proper dough structure.
Q4. Why is my bread dense instead of airy?
Dense bread usually results from too much flour, insufficient rise time, or expired yeast. Ensure your yeast is fresh (test in warm water with sugar – it should foam), maintain the sticky dough consistency, and allow the full rise time. Room temperature affects rising; cooler rooms need longer fermentation.
Q5. Can I double this recipe?
While you can double the ingredients, it’s better to make two separate loaves rather than one giant one. Large loaves don’t bake evenly in home ovens. Mix doubled ingredients in a very large bowl, divide after the first rise, and bake separately. You might need to bake them one at a time depending on your Dutch oven size.
Print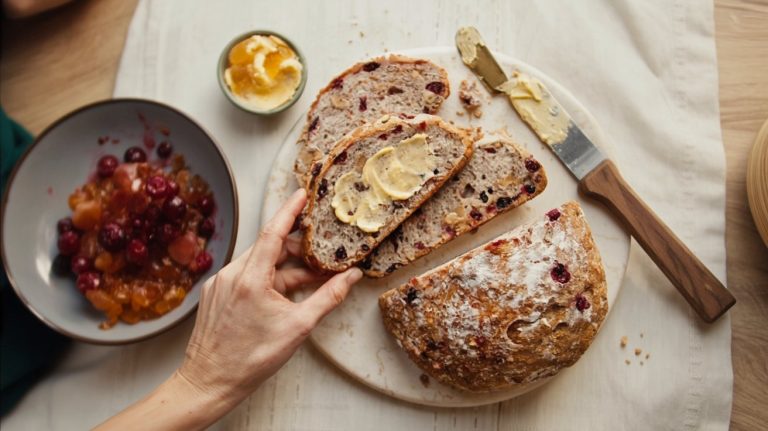
Crusty Cranberry Nut No-Knead Bread: Bakery-Style Magic
You’ll bake a gorgeous, bakery-style artisan loaf—crusty on the outside, tender inside—packed with dried cranberries and toasted nuts. This no-knead Dutch oven bread takes only ~15 minutes of hands-on time; long, slow fermentation (12–18 hours) develops deep flavor and an irresistible crackly crust.
- Total Time: 13–19 hours
- Yield: 1 loaf (about 12 slices)
Ingredients
-
Bread flour or all-purpose flour — 3 cups + 2 Tbsp (390g), spooned & leveled, plus more for dusting
-
Coarse sea salt — 2 tsp
-
Instant yeast — ½ tsp (Platinum Yeast from Red Star recommended)
-
Chopped walnuts or pecans — ¾ cup (95g), fresh, roughly chopped
-
Dried cranberries — ¾ cup (105g), plump and sweet-tart
-
Honey — 1 Tbsp (21g), for subtle sweetness
-
Warm water — 1½ cups (360ml), about 95°F/35°C
Instructions
-
Mix the dough (5 min): In a large bowl, stir together flour, salt, instant yeast, nuts, and cranberries. Dissolve honey in warm water; pour over dry ingredients. Mix with a spatula until a shaggy, sticky dough forms. It should look very wet—don’t add extra flour.
-
First rise (12–18 hrs): Tuck the dough into a rough ball with the spatula. Cover the bowl tightly (plastic wrap or damp towel) and rest at room temp until doubled with visible surface bubbles.
-
Shape (5 min): Turn dough onto a lightly floured surface. With floured hands, gently shape into a ball. Set on a large piece of parchment (high-heat safe). Score an “X” about ¼-inch deep. Place parchment and dough in a bowl to help it keep shape.
-
Second rise & preheat (30 min): Loosely cover and rest 30 minutes. Meanwhile, place your Dutch oven (with lid) in the oven and preheat to 475°F (246°C).
-
Bake covered (25 min): Carefully remove the hot pot. Lift dough by parchment and lower into the pot. Cover and bake 25 minutes.
-
Finish uncovered (8–10 min): Remove lid and bake until deep golden and crisp, 8–10 minutes more. The bottom should sound hollow when tapped; internal temp about 195°F (90°C).
-
Cool: Transfer to a rack and cool at least 20 minutes before slicing so the crumb sets and stays tender.
Notes
-
Why so wet? A higher-hydration dough creates steam in the pot, building dramatic oven spring and a shattering crust.
-
Timing tip: Start the first rise in the evening for fresh bread the next morning.
-
Flour: Bread flour gives extra chew; AP flour also works.
-
Add-ins: Swap walnuts for pecans 1:1.
-
Storage: Once cool, store at room temp in a paper bag or wrapped in a clean towel up to 2 days; slice and freeze up to 2 months.
- Prep Time: 10 minutes
- Cook Time: 35 minutes
- Category: Bread
- Method: No-knead, Dutch oven
- Cuisine: American/Artisan bakery-style
Nutrition
- Serving Size: 1 slice (1/12 loaf)
- Calories: 180
- Sugar: 6 g
- Sodium: 390 mg
- Fat: 4 g
- Carbohydrates: 32 g
- Fiber: 2 g